DrT's Stereo Equipment Repair Information
I repair the following 1950s vintage stereo equipment:
1 - Stereo Realist cameras (see below) 2 - Stereo Realist viewers (see: www.RealistRepair.com/RBRepair.htm) 3 - Other types of stereo slide viewers from the 1950s (contact me) 4 - TDC Stereo projectors (contact me) |
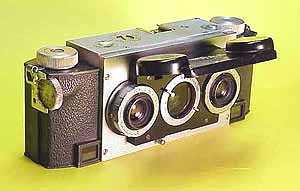
Stereo Realist camera repairs
See also my web page: www.drt3d.com for stereo supplies
 |
Through the years I have learned to examine, CLA (clean, lube, adjust) and repair Stereo Realist cameras... It takes me a total of 3-4 hours to go through a Stereo Realist. I make sure that I check all basic functions and report on the work done. The report includes a calibration table of the shutter speeds. I do everything except for shooting a roll of film through the camera. I recommend that you shoot a test roll of film before using the camera for an important assignment.
Note: I only repair the "David White" Stereo realist, not the Realist 45, which is similar to the Iloca stereo camera and was made in Germany. Also, I do not widen the apertures of the Stereo Realist. See www.3drealist.com for more details regarding this.
Unsolicited Testimony:
"As the recent recipient of some cameras which have gotten Dr. T's tender ministrations, I want to give his service an unqualified highest recommendation! The service itself is excellent, and it is very reasonably priced. In addition, Dr. T has been very helpful in communicating via e-mail about the state of the cameras, and other related topics. Thanks, George!" - Peter Davis
"I was very impressed by the condition of the camera I received, how well it worked, and the usefulness of your book. Even though I paid about $50 more than I may have found one on eBay, I still feel like I got a bargain." Robert Swirsky
"I'd just like to add my recommendation as well. I've had a Realist camera and a viewer reconditioned by Dr. T, and in both cases the work was stellar and well worth the money. It was like getting back brand-new goods." - Don Munsil
"Instead of fixing my old Realist 3.5, you have apparently given me a new camera and have kept the old one!" - Chris Helms
I back my work with a six (6) month warranty, during which time I will repair anything that might go wrong with the camera. Because of my very reasonable rates, I am only asking that you pay for shipping if you are sending the camera back.
My fee for a reconditioning/repair work is $125 plus return shipping ($10 in the USA for priority mail with delivery confirmation - insurance, if desired, is extra). My turn-around time varies from 2 to 4 weeks. Contact me via email if you have any questions or need the camera sooner.
HERE ARE TWO USEFUL ACCESSORIES THAT I RECOMMEND THAT YOU HAVE ME INSTALL AS PART OF THE CAMERA REPAIR:
- Depth of Field scale (if your camera does not have one), for $12 extra
- Aperture Handles, for $25 extra (only available for later Stereo Realists, contact me for detail)
- If you camera needs a lens cover (recommended because it keeps the lenses free of dust) then I charge $20 extra for the part.
If you are mailing a Stereo Realist to me, please pack well and include a note with any known problems. If you have email, please email me at drt-3d@live.com to let me know that the camera is coming. I will save your email and keep you informed of my progress. I will also email you the report and shutter speed calibration.
Mail the camera with a check for $135 plus anything extra (if needed) to:
George
Themelis
10243 Echo Hill Drive
Brecksville OH 44141
440-666-4006
drt-3d@live.com
You can also pay with paypal if you prefer. In this case, I will email you when I am done, and give you the total amount.
Here is an outline of my work with the Stereo Realist:
| Lens Board & Lenses | Remove the lens board. Clean/lubricate the aperture rings (many times these are stiff). Clean the lens board. Clean the lenses front and back. |
| Clean Camera Body Outside and Inside | With the lens board removed, I do the following: Check the shutter for smooth operation. Blow off any dust or loose particles from the shutter area. Remove the viewfinder lens and clean it front and back. Remove and clean the two glass rangefinder windows. Remove and clean the viewfinder and rangefinder lenses in the back of the camera. Dust off and clean camera interior and exterior. |
| Check shutter | I check the shutter with the lens board off. Occasionally, the shutter hangs open at the slow shutter speeds. If this is the case, I first flush-clean the timing mechanism. If this does not help, I remove the timing mechanism, and clean it in an ultrasonic cleaner. If this does not solve the problem, then I replace the timing mechanism. Occasionally, the shutter blades are worn/broken and need to be replaced. I also make sure that both R and L shutters are matched (open and close at the same time). |
| Flash Check & Synchronization | With the lens board removed, I check for proper flash operation and synchronization. In almost all Realists when the electronic flash fires, the shutter is not fully open. This can cause unnecessarily dark flash pictures. I clean and adjust the flash contact for proper flash synchronization. |
| Assembly Camera | Put lens board back in place. Check and clean lens cover. Repaint Realist logo in cover. |
| Check/Adjust Focus | I check the camera focus using a ground glass and a special 30X focusing achromatic magnifier, made in Japan, for checking camera focus. (Note: The magnification of a typical stereo slide viewer is about 5x, so with this magnifier I see an image 6 times as large as the one seen in the viewer!) I check focus at 10 feet. If the focus is off, I adjust it. This is a rather complicated procedure. |
| Check/Adjust Rangefinder | After the focus is adjusted, I check and adjust (if needed) the rangefinder. Note that the purpose of the rangefinder is to aid in focusing. It is there only for information purposes. It does nothing to the picture-taking process. If the rangefinder does not agree with the focusing dial, trust the focusing dial, not the rangefinder! |
| Measure shutter speeds | I measure the shutter speeds at all settings and report their values. The low speeds (1 to 1/10 sec) are usually OK. For some unknown to me reason, the 25 speed is usually right on. The top speeds (1/50 to 1/150 or 1/200) are usually a bit slow. I try to correct by tightening the shutter spring. The 100 speed is the most difficult to adjust and it is usually slow. It is also the most frequently used speed of this camera. I usually just report this speed so you know what it is. It is a good idea to use the top speed, instead of the 100, because it is more reliable. |
| Film advance | I lubricate the film advance gears and check that the film advances properly, the film counter works well, the red flag comes on after each exposure and the double-exposure-prevention (if available) works well. Note: A small amount of film frame overlap is rather common and due to the slack in the various components. There is nothing I can do about this. Occasionally, the film advance springs are broken and need to be replaced. I charge extra for this. |
| Light Leak Patch | Due to a design flaw, Stereo Realists are prone to light leaks. This is usually solved by tightening the camera back and installing a strip of tape at the edge where the back meets the body in the back right side (by focusing wheel). I install this patch by default in all cameras. |
Usually there is nothing required other than my standard labor charge. But if there are parts missing or need to be replaced, I have to charge extra to cover my cost of buying these or removing them from other cameras.
For
more information about the Stereo Realist, please check my Stereo
Realist web page:
DrT's Stereo
Realist Page
Or
my very detailed book on the Stereo Realist:
DrT's Stereo Realist Book
 |